This guide walks district and school administrators through connecting a OneRoster-compliant Student Information System (SIS) to Colleague AI using OAuth 1.0 or OAuth 2.0 credentials. Once connected, Colleague AI automatically imports teachers, students, classrooms, and enrollments, and keeps them up to date with a daily sync
Before You Begin
Request the following from your SIS administrator or SIS vendor. Most OneRoster providers issue these from an “API access”, “OneRoster”, or “third-party application” settings page.
Item | OAuth 1.0 | OAuth 2.0 | Description |
Access URL | Required | Required | The base URL of your OneRoster REST API, e.g. https://example-test-123.rosterserver.com |
Token URL | — | Required | The OAuth 2.0 endpoint that issues access tokens, e.g. https://example.com/oauth/token |
Client Key | Required | Required | The client ID / consumer key issued for Colleague AI |
Client Secret | Required | Required | The secret paired with the Client Key |
Which version should I choose? Use the OAuth version your SIS vendor supports. If your vendor gives you a Token URL, choose OneRoster OAuth 2.0. If you only received a key and secret (sometimes called a consumer key and shared secret), choose OneRoster OAuth 1.0.
You will also need an Admin account in Colleague AI with access to the Integrations page.
Step 1: Open the Integrations Page
- Sign in to Colleague AI as an administrator.
- In the left navigation, select Integrations.
- Make sure the Rostering tab is selected, then click Add Rostering.
Step 2: Create the Integration
Fill in the Add Rostering panel. The fields differ slightly depending on the OAuth version.
Option A: OneRoster OAuth 1.0
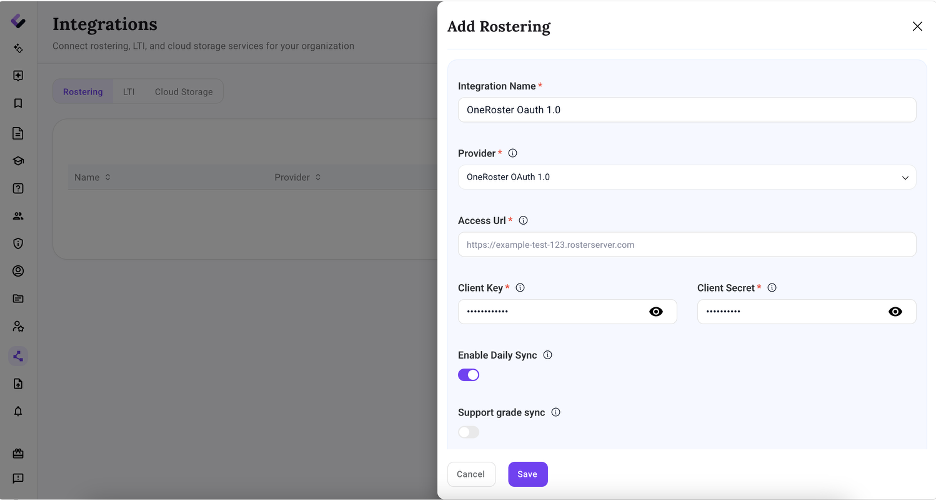
Field | What to enter |
Integration Name | A friendly name you will recognize, e.g. “OneRoster OAuth 1.0” or “District SIS”. |
Provider | Select OneRoster OAuth 1.0. |
Access Url | The OneRoster API base URL from your SIS vendor. |
Client Key | The key issued by your SIS. Use the eye icon to confirm it was pasted correctly. |
Client Secret | The secret issued by your SIS. |
Enable Daily Sync | Leave on (recommended) to sync rosters automatically once a day. |
Support grade sync | Turn on only if your SIS supports receiving grades through OneRoster and your district wants grades passed back. |
Option B: OneRoster OAuth 2.0
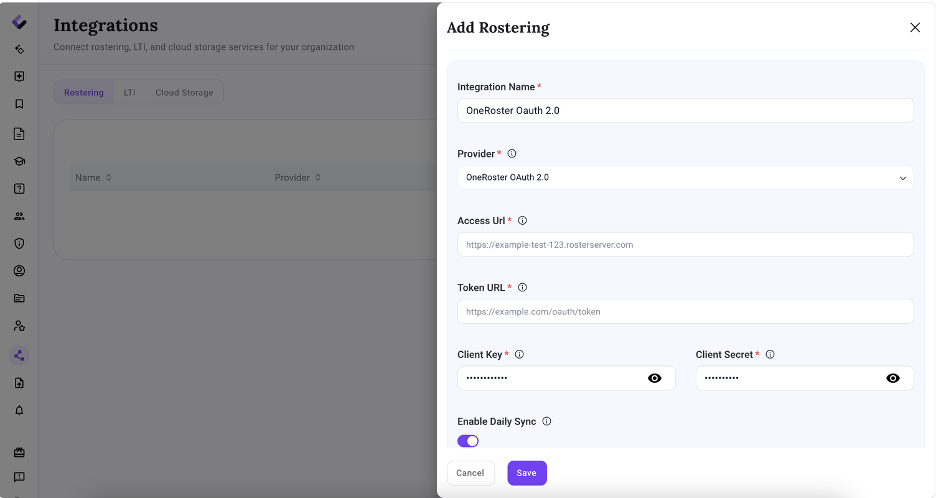
Field | What to enter |
Integration Name | A friendly name, e.g. “OneRoster OAuth 2.0”. |
Provider | Select OneRoster OAuth 2.0. |
Access Url | The OneRoster API base URL from your SIS vendor. |
Token URL | The OAuth 2.0 token endpoint from your SIS vendor. |
Client Key | The client ID issued by your SIS. |
Client Secret | The client secret issued by your SIS. |
Enable Daily Sync | Leave on (recommended) to sync rosters automatically once a day. |
When all required fields are complete, click Save.
Tip: Copy and paste credentials rather than typing them, and check for leading or trailing spaces. Most connection errors come from a mistyped secret or an incorrect URL.
Step 3: Run the First Sync
- Open the integration you just created to view the SIS Integration
- Click Sync Now in the top-right corner to start the initial sync. Depending on district size, the first sync can take several minutes.
- When complete, the banner shows Last succeeded sync and the Sync Data cards show totals for teachers, students, classrooms, and enrollments.
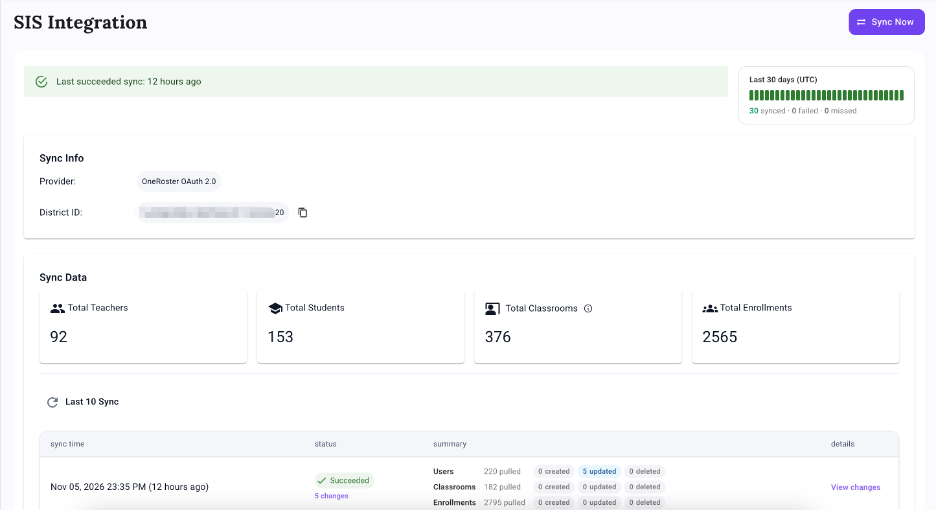
The SIS Integration page also shows:
- Last 30 days (UTC) – a daily history of synced, failed, and missed syncs.
- Sync Info – the provider and District ID for this connection.
- Last 10 Sync – the number of users, classrooms, and enrollments pulled, created, updated, and deleted in each run. Click View changes to see record-level details.
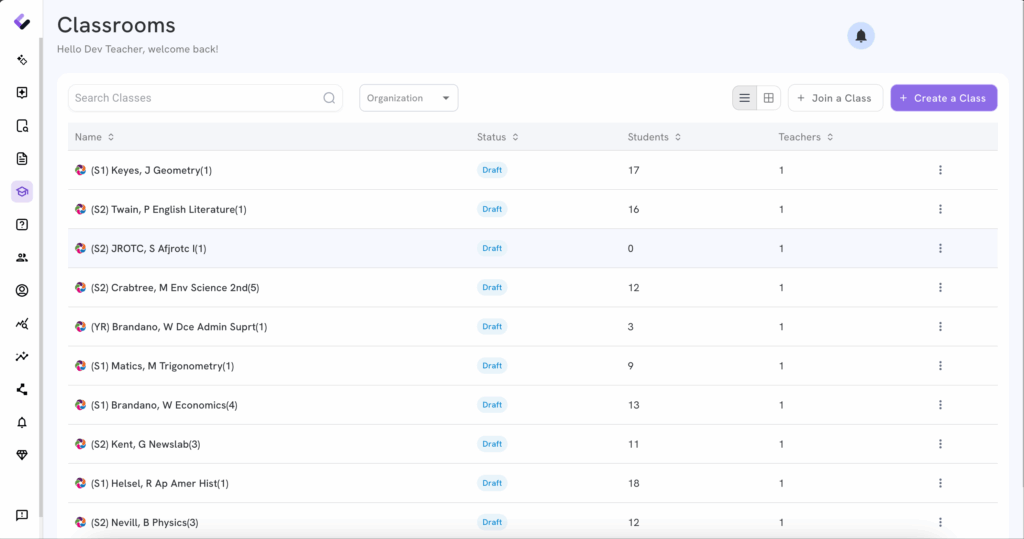
Step 4: Verify Classrooms and Enrollments
Go to the Classrooms page to confirm imported classes. Rostered classes are labeled OneRoster and show the assigned teacher and student count.
Step 5: Verify Users
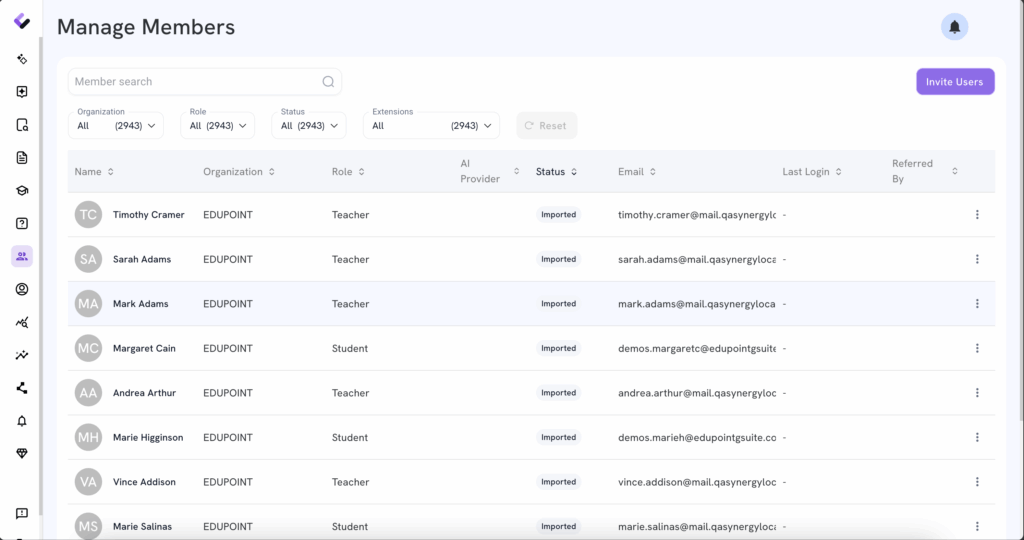
Go to Manage Members to review imported teachers and students. Users created by the integration show OneRoster as their source; users added by hand show Manual.
Troubleshooting
Issue | What to check |
Save fails or sync returns an authentication error | Confirm the Client Key and Client Secret are correct and active. For OAuth 2.0, confirm the Token URL is correct. Make sure you selected the OAuth version your vendor issued credentials for. |
Sync fails with a “not found” or connection error | Verify the Access URL with your SIS vendor, including whether the OneRoster path (for example, /ims/oneroster/v1p1) should be part of the URL. |
Classes or students are missing | Confirm the records are shared with Colleague AI in your SIS, are in an active term/academic session, and have a teacher assigned. |
Duplicate users | Users who existed in Colleague AI before rostering may not match if their email in the SIS differs. Align emails in the SIS, then run Sync Now. |
Changes in the SIS are not showing | Rosters update on the daily sync. Click Sync Now to pull changes immediately. |
Need help? Contact Colleague AI support with your District ID (shown on the SIS Integration page) and the time of the failed sync.